【Xcode】 Import GoogleAdMob (GAdMobの導入方法)
Overview(概要)
⓪Generate Xcode project.
(⓪Xcodeプロジェクトを作る。)
①Import Google-Mobile-Ads-SDK into a Xcode project by Cocoapods.
(①Cocoapods を使って Xcode プロジェクトに Google-Mobile-Ads-SDK を導入する。)
②Add keys to Info.plist.
(②Info.plistにkeyを追加し、)
③Describe initialize code in AppDelegate.
(③AppDelegateでイニシャライズコードを記述。)
Conditions(前提)
MacOS: 11.5.2 (Big Sur)
Xcode: 13.0
Swift: 5.5
⓪Generate a project (プロジェクト作成)
Open Xcode and click [Create a new Xcode project].
Xcodeを開いて「Create a new Xcode project」をクリックします。
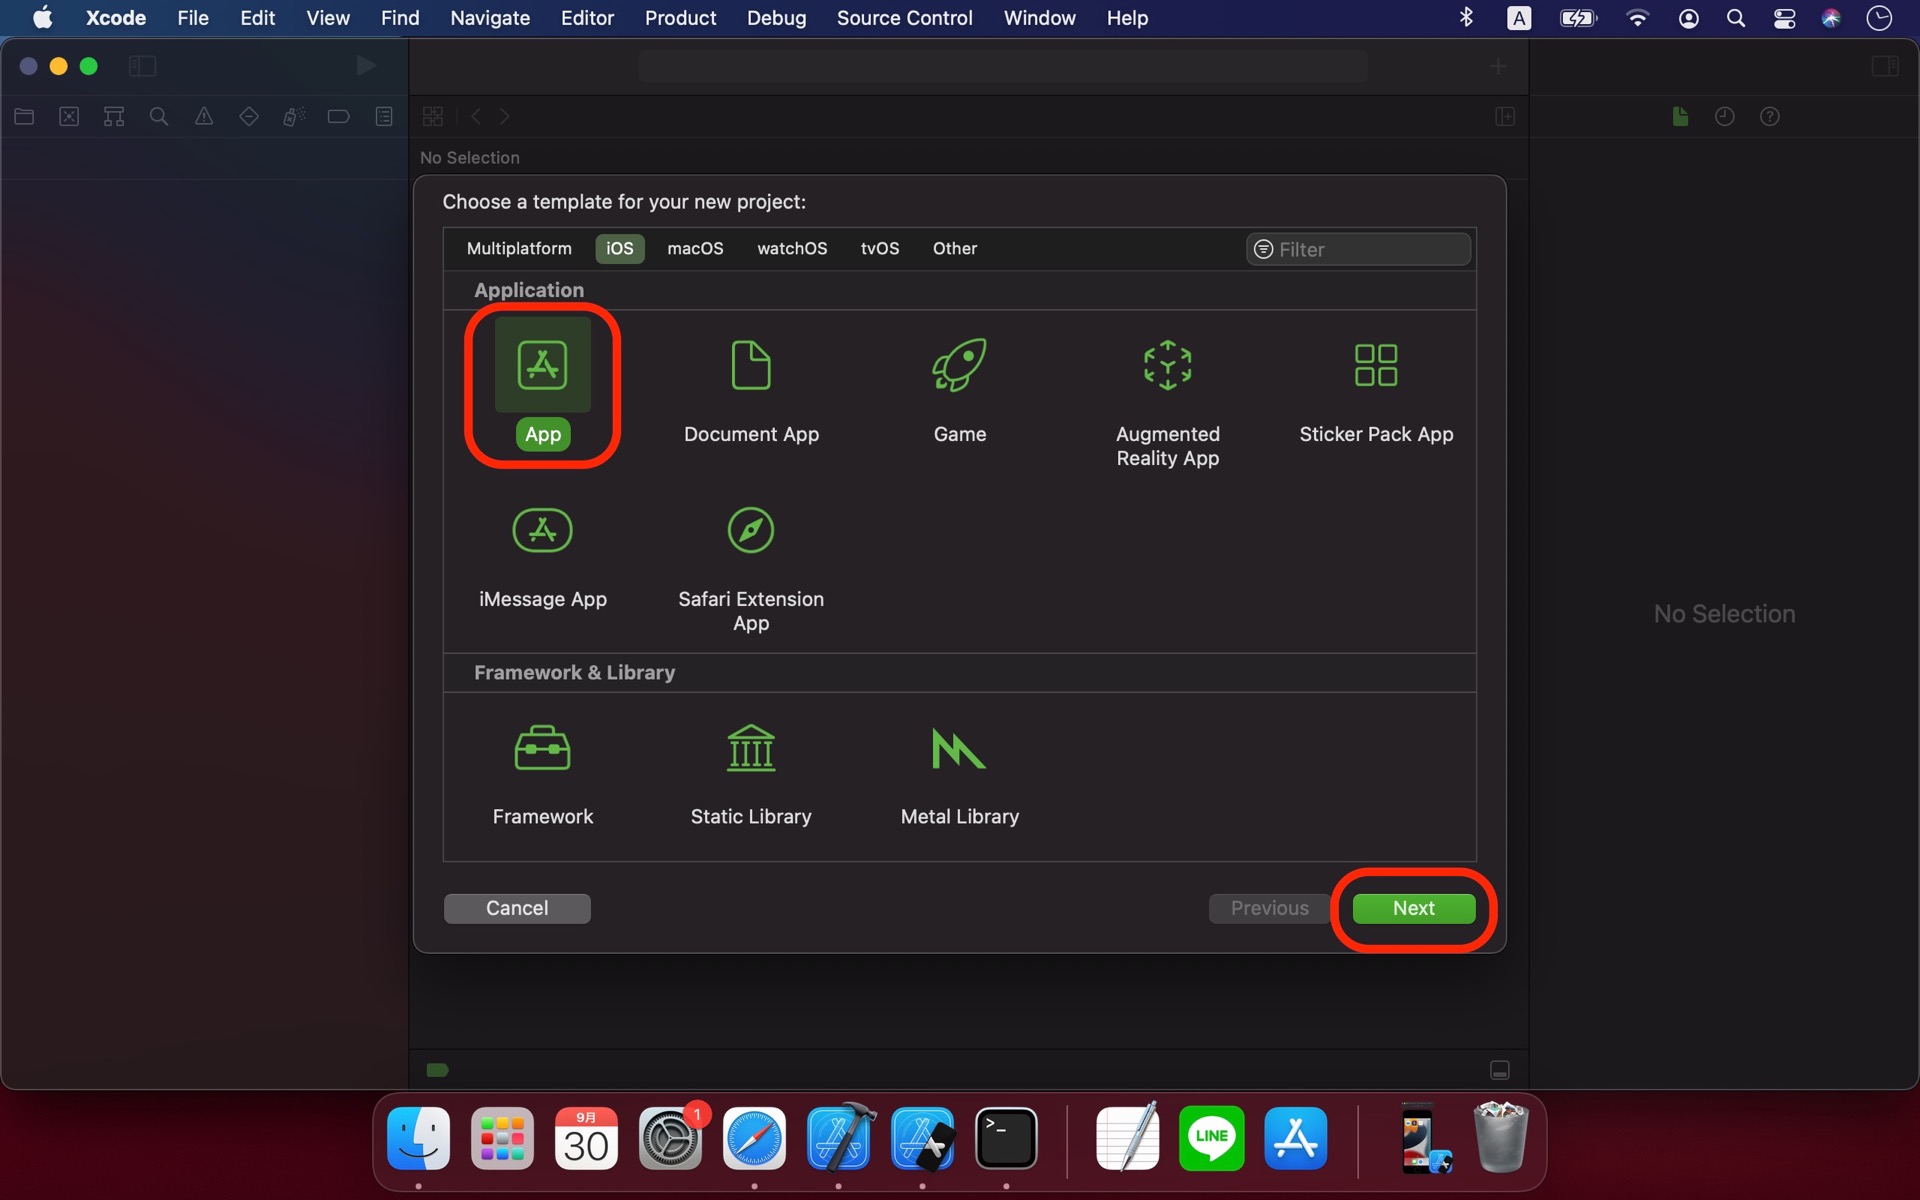
Select [App] and click [Next].
「App」を選択して「Next」をクリック。
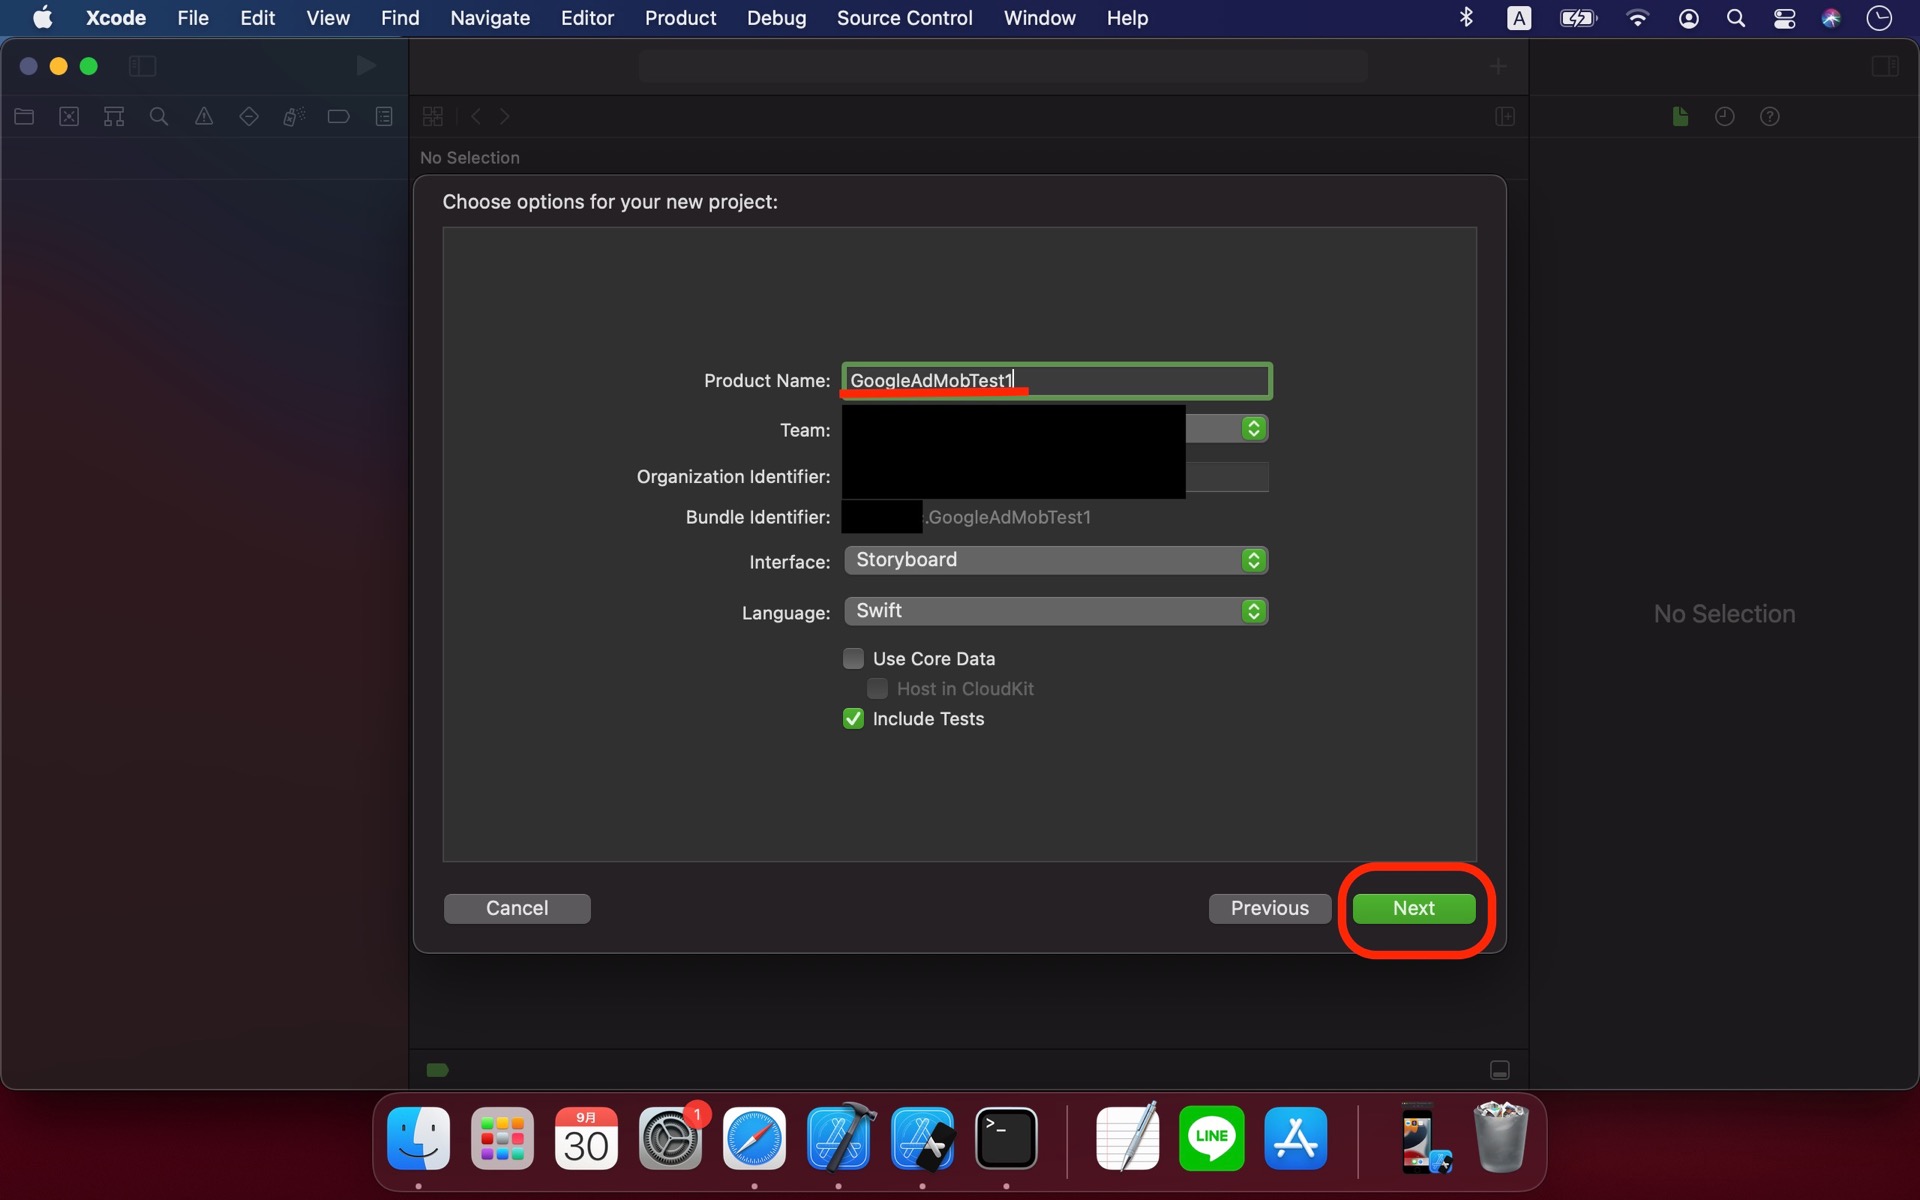
Name the project and click [Next].
プロジェクトに適当な名前をつけて「Next」へ。
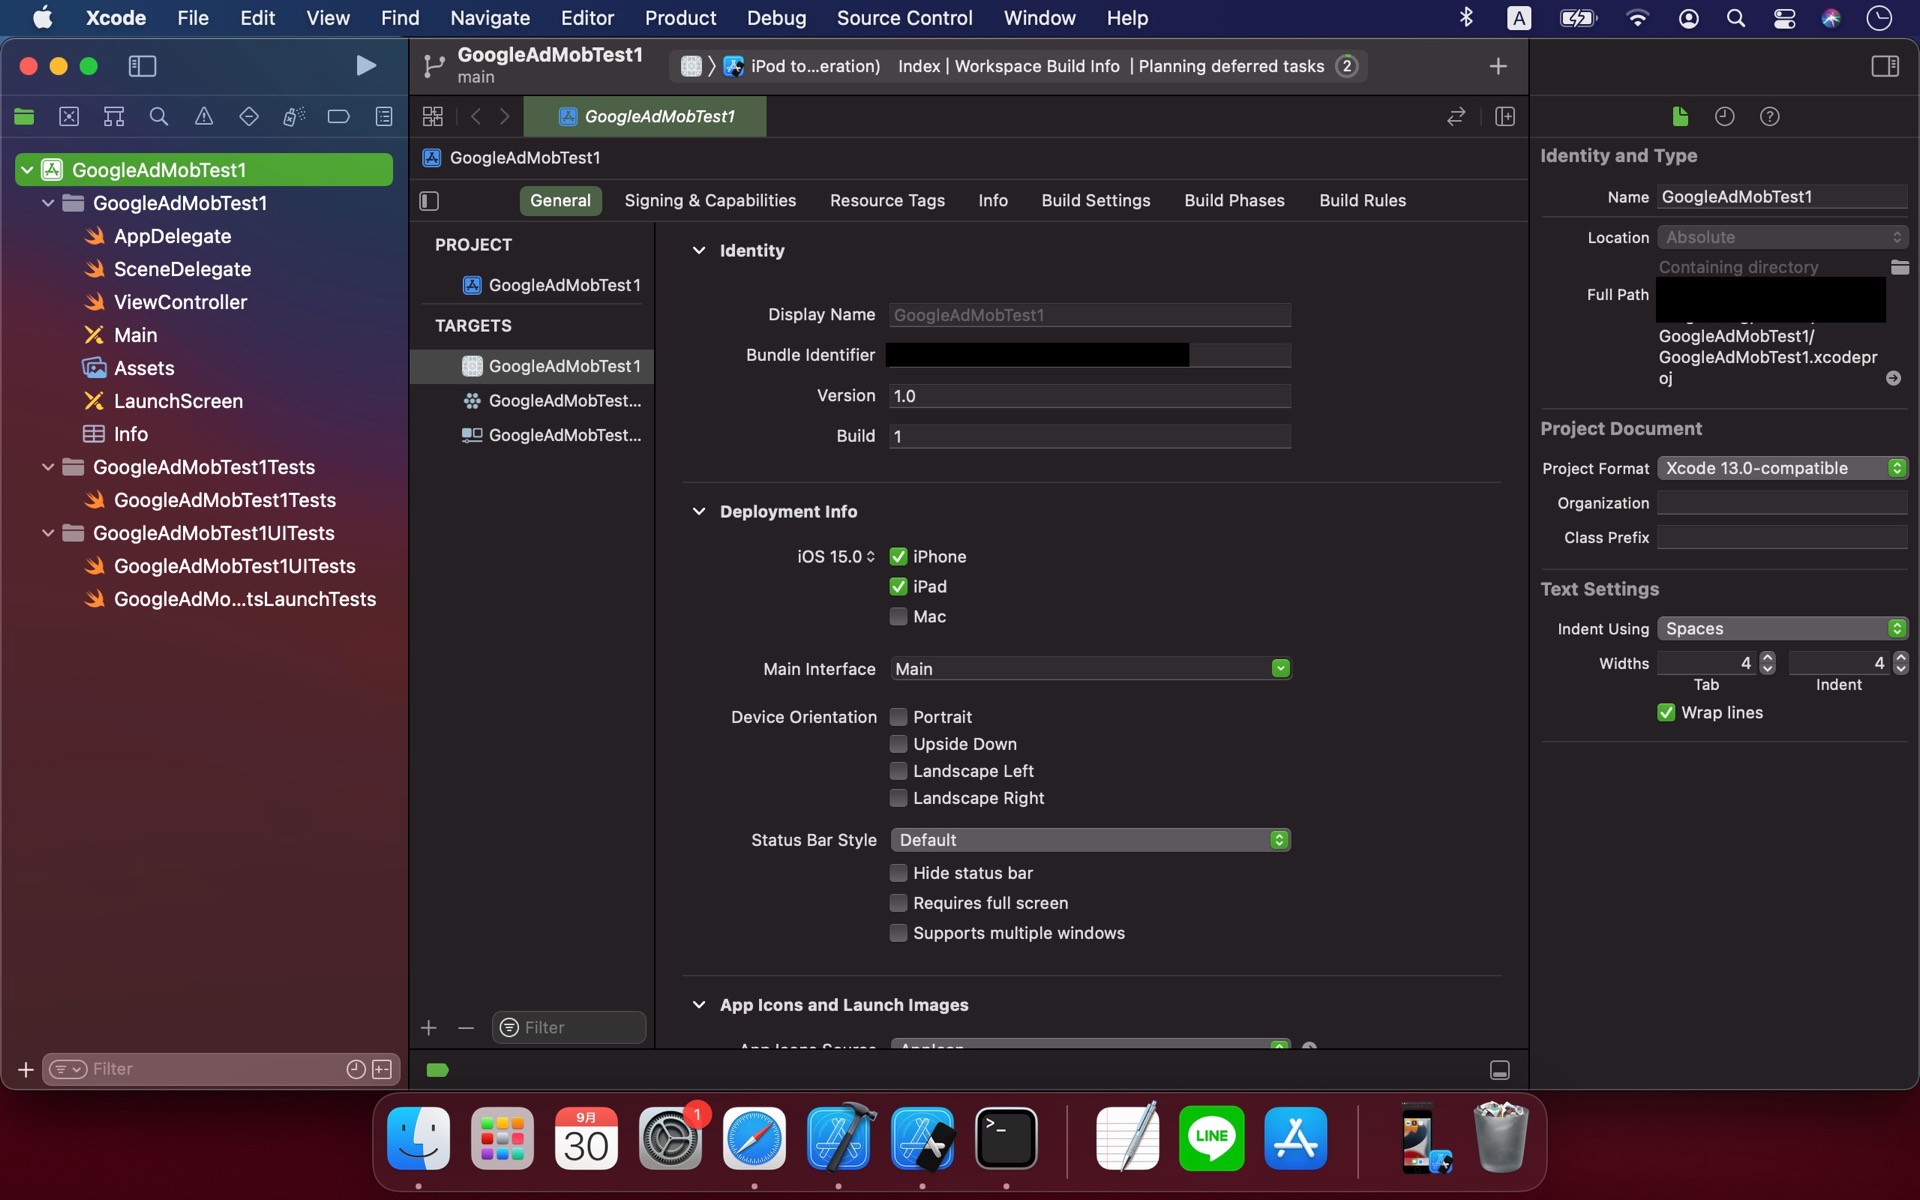
Project is generated.
Close the window in preparation for import pods.
プロジェクトが作成されます。
podsを導入するためにプロジェクトのウィンドウを閉じます。
①Import GAdMobSDK (GAdMobSDKの導入)
Open your Finder and search project generated a while ago.
Open terminal and type [cd ].(Don't press Enter.Don't miss a space after command cd)
Drag your project file to terminal. It'll show the full path to the project.
Press Enter.
Finder を開き先程のプロジェクトファイルのある階層まで移動します。
terminalを開き「cd 」と入力します。「cd」の後ろにスペースがあります。Enterは押さないでください。
FinderのプロジェクトファイルをterminalにドラッグアンドドロップしてEnterを押下。
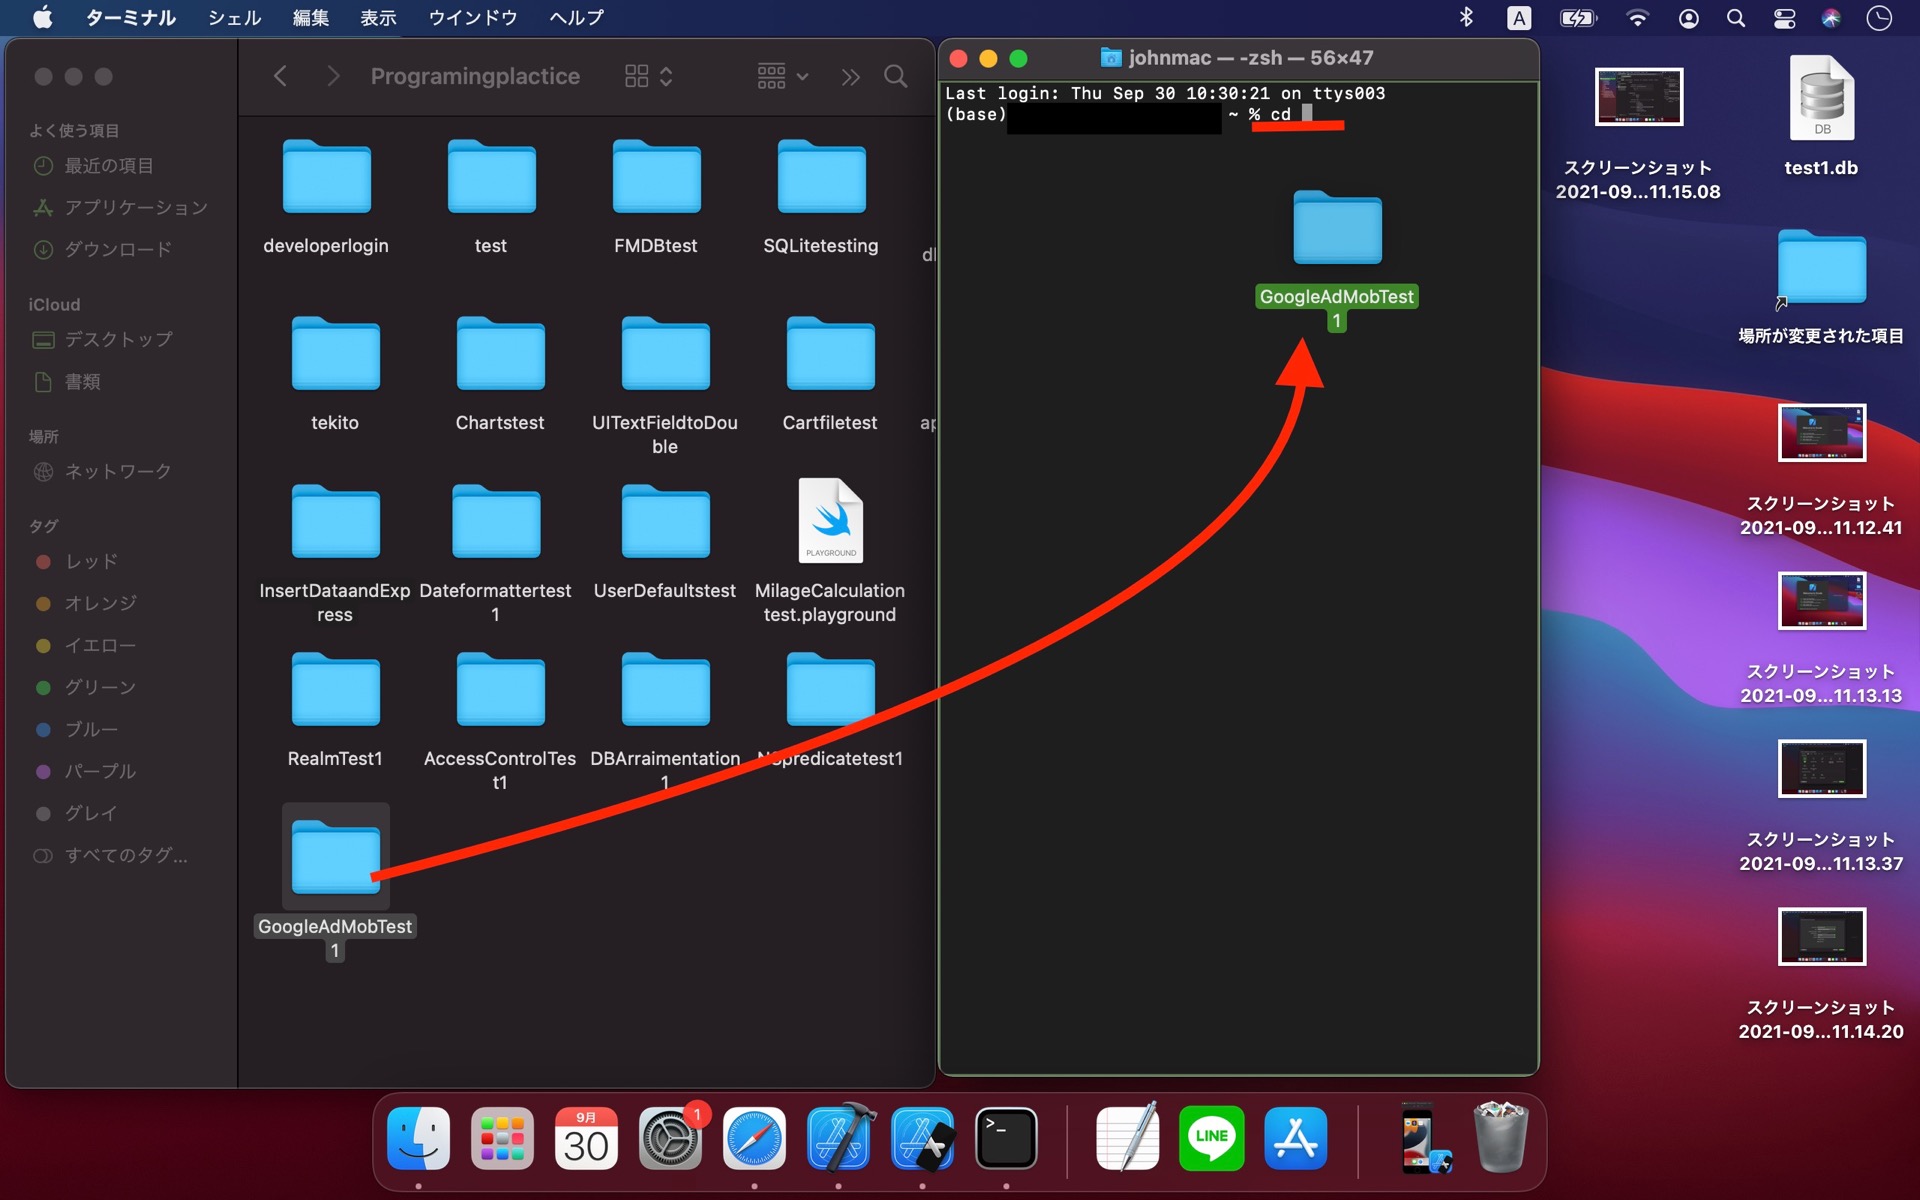
Current directory is changed from root to the project file.
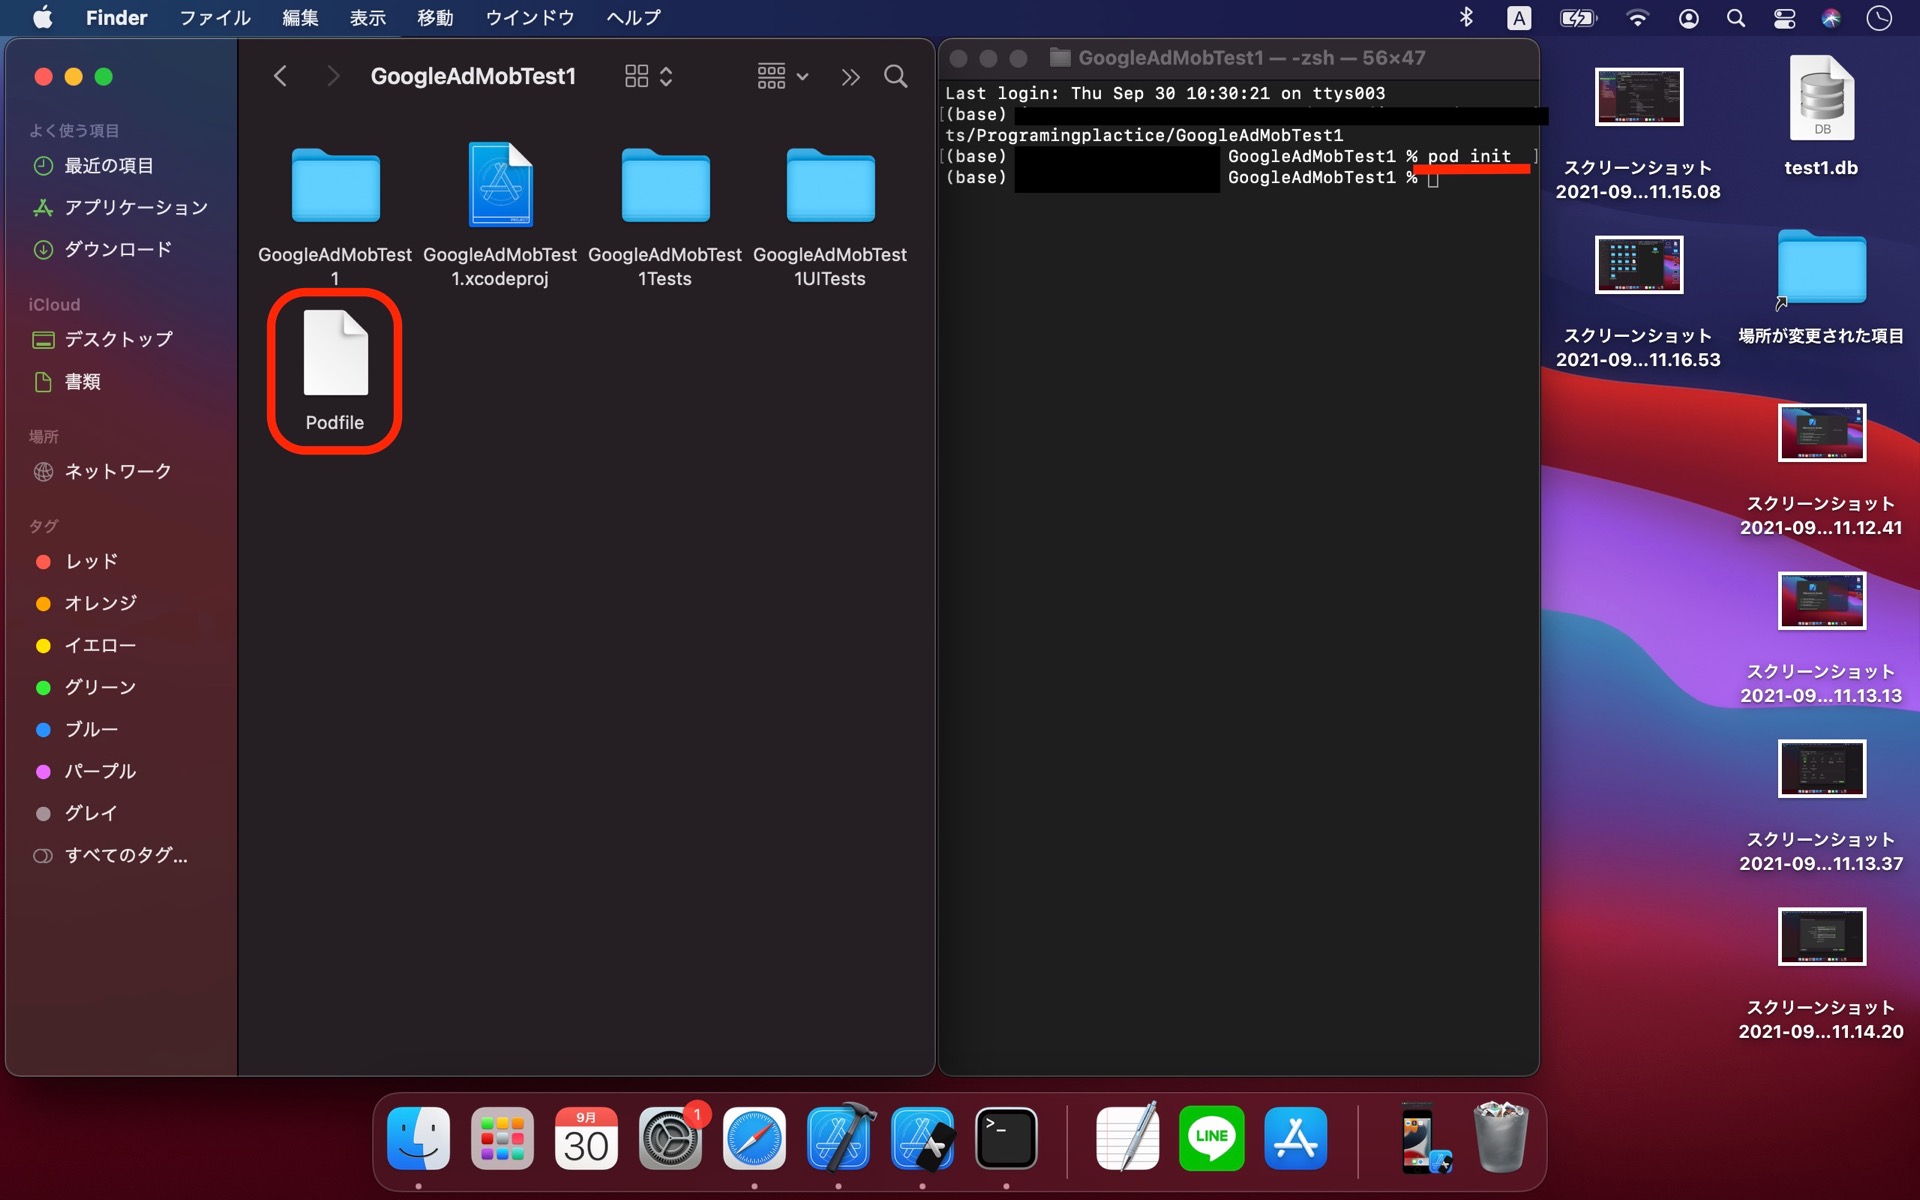
Insert [pod init] and press Enter.
Podfile is generated in Finder. Double click and open it.
ターミナルのカレントディレクトリがプロジェクトファイルに変わります。
「pod init」と入力して Enter。
Finder にPodfile が生成されますのでそれをダブルクリック。
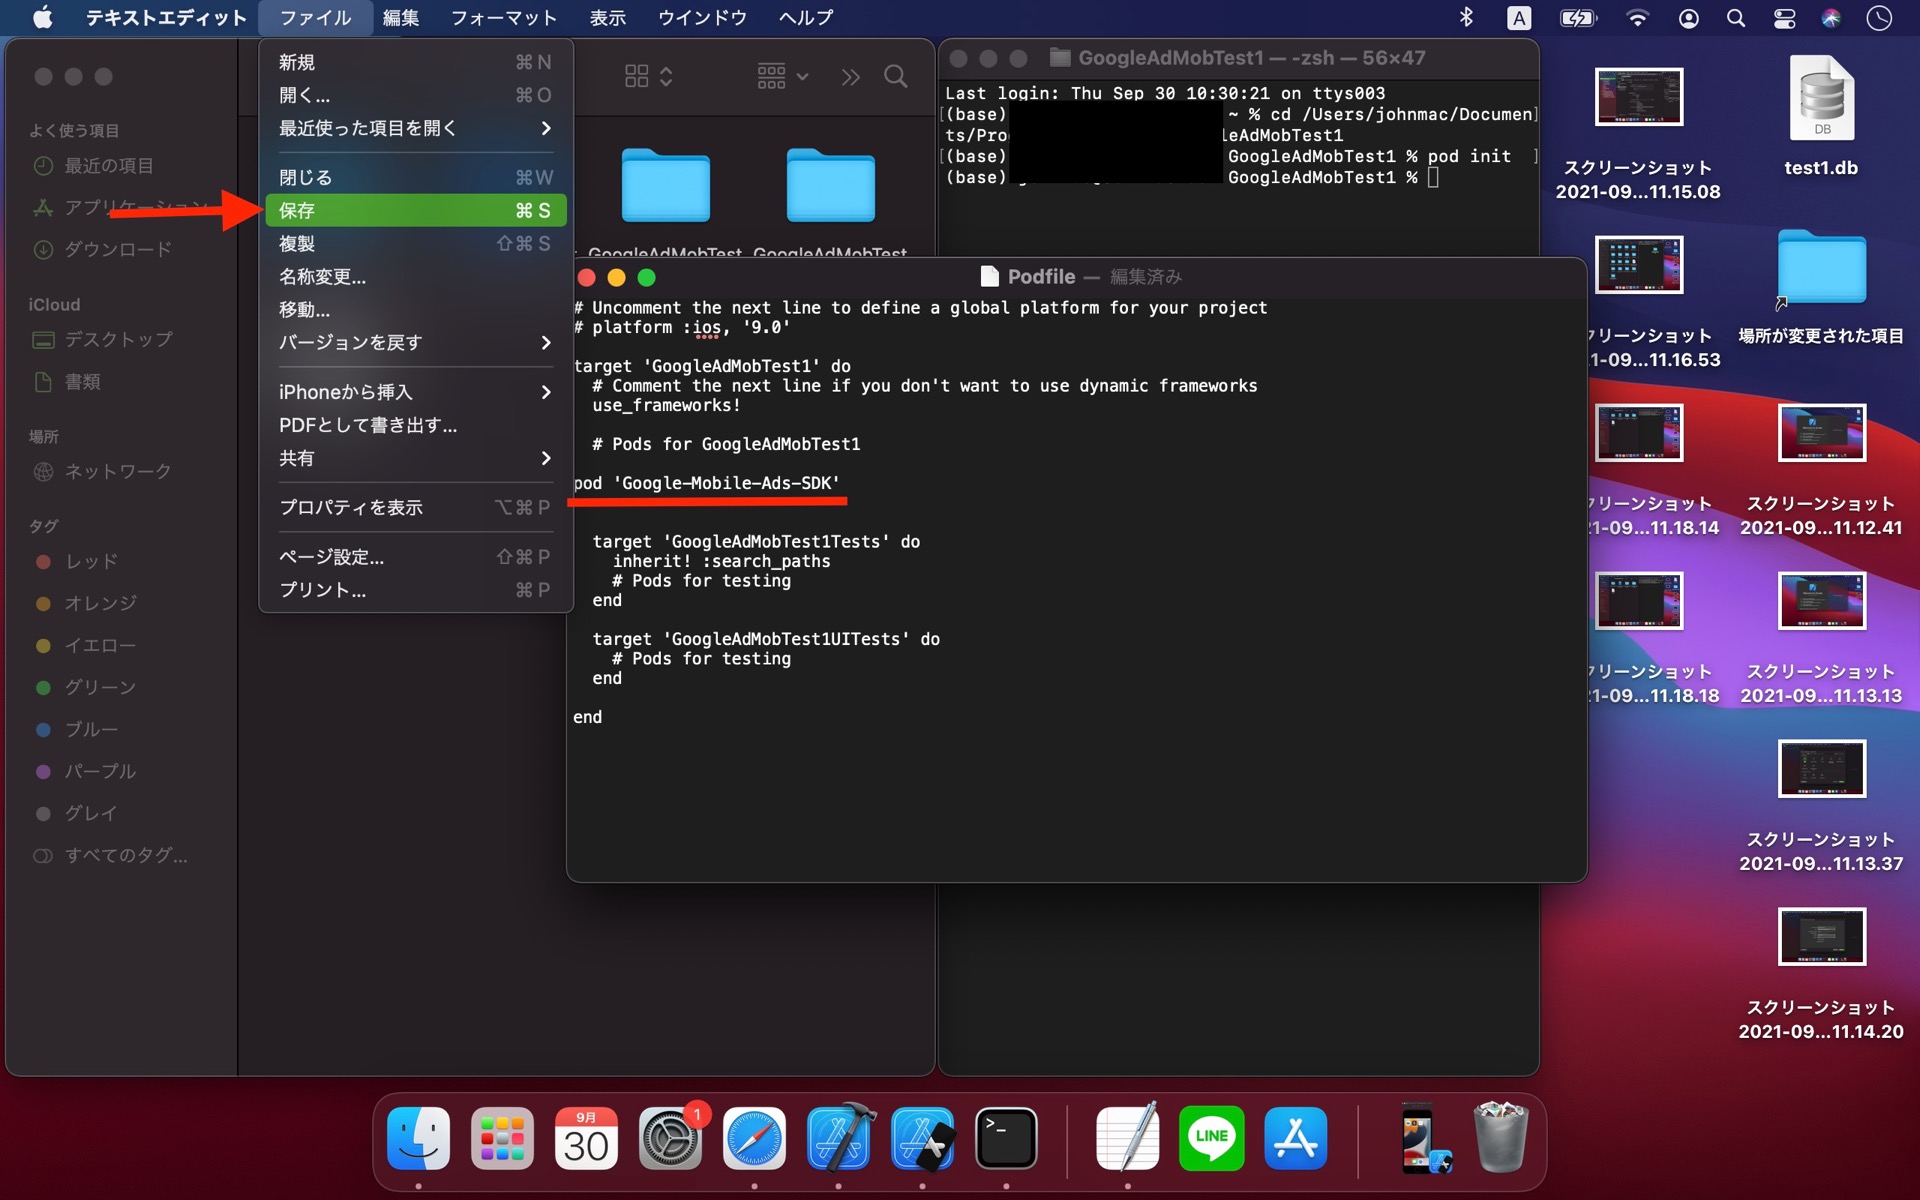
Insert code [pod 'Google-Mobile-Ads-SDK'] at under [# Pods for ...].
Save and close it.
「# Pods for ...」の下に「pod 'Google-Mobile-Ads-SDK'」を入力。
保存して閉じます。
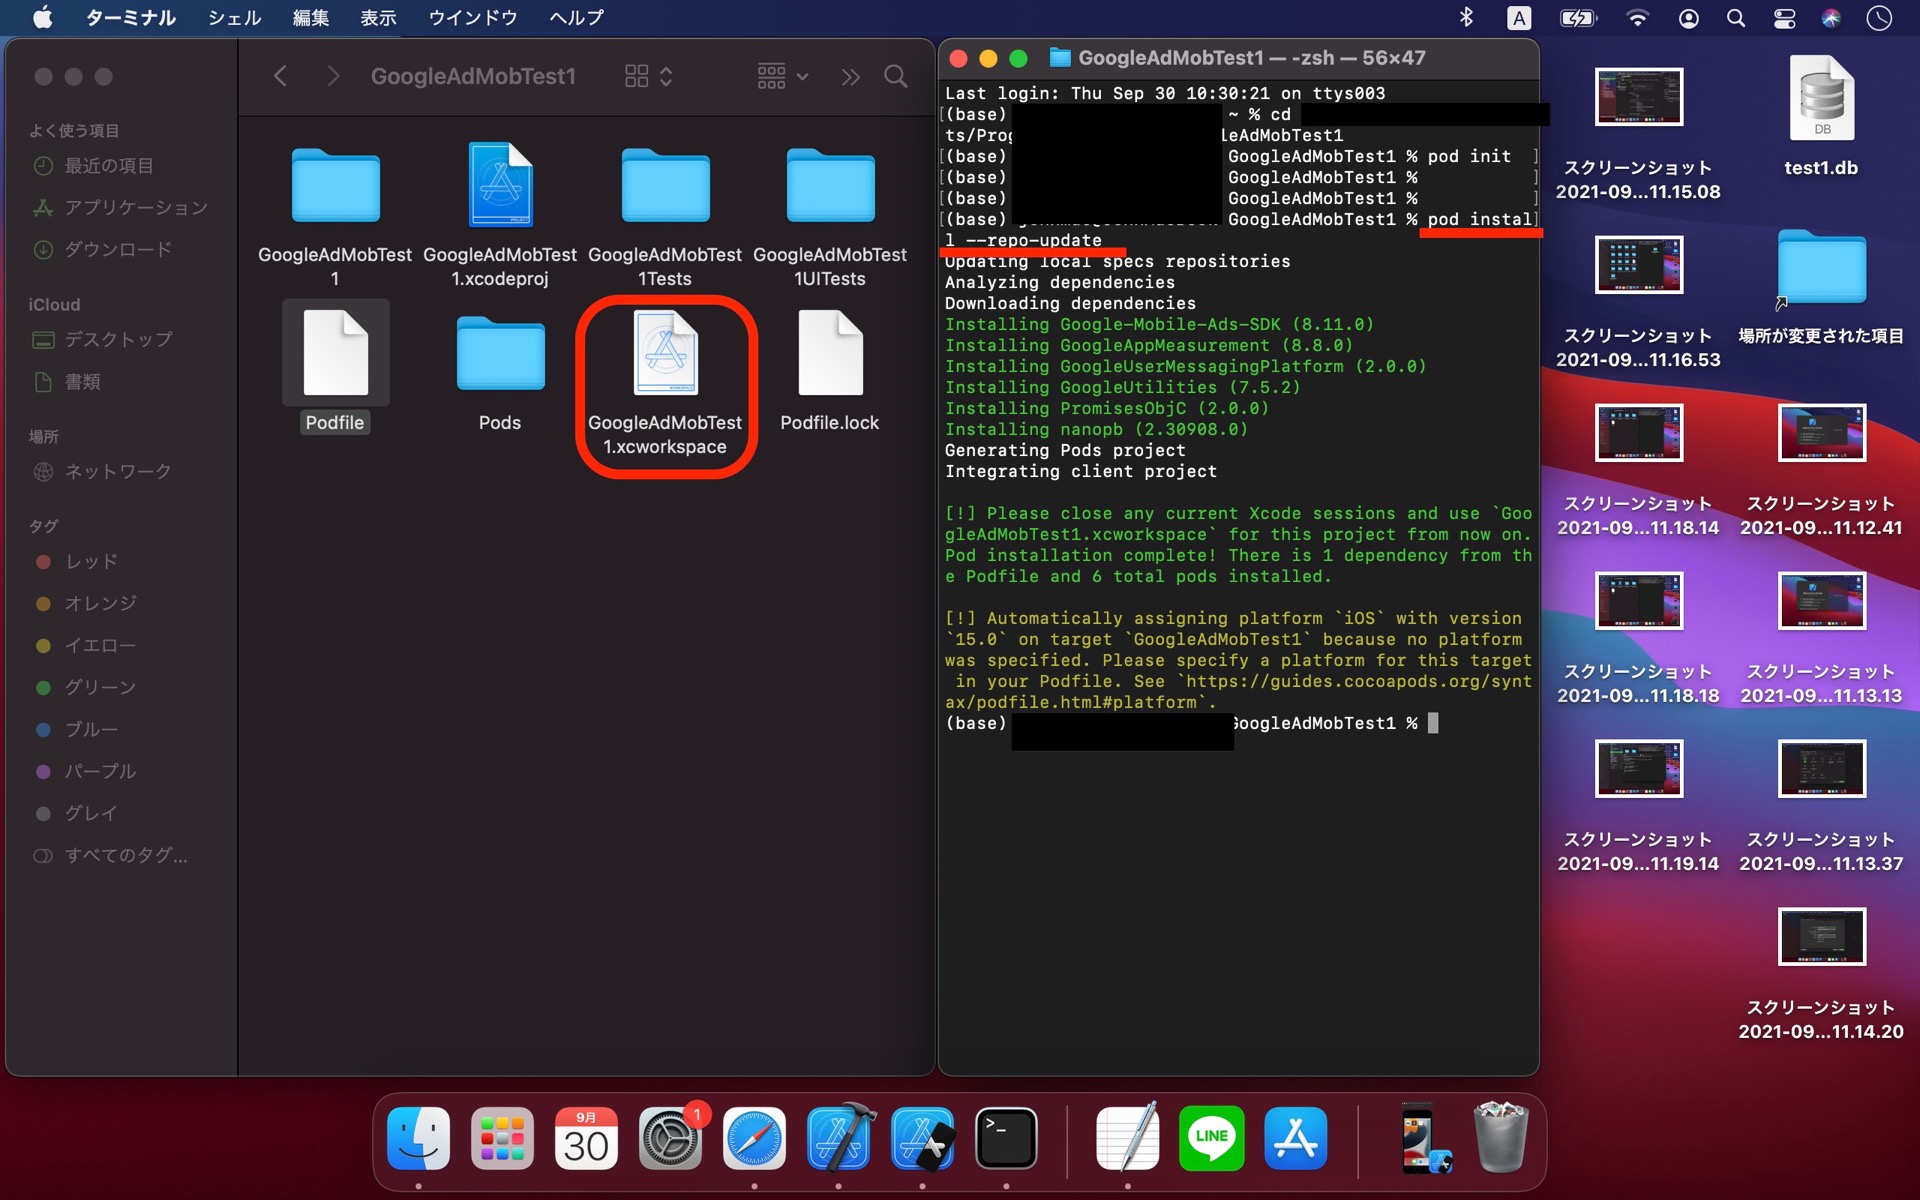
Pay attention that the place of current directory is project file. (If you don't anything else, It doesn't matter.)
Insert [pod install --repo--update] and press Enter at terminal.
.xcworkspace file is generated soon on finder.
Hereafter, we must open .xcworkspace file instead of .xcodeproj file to edit project.
terminal のカレントディレクトリがプロジェクトファイルのままになっていることを確認して、
「pod install --repo--update」を入力してEnter。
.xcworkspace という拡張子を持つファイルが生成されます。
以後はこの .xcworkspace というファイルからプロジェクトを編集します。
②Add keys to info.plist (キーの追加)
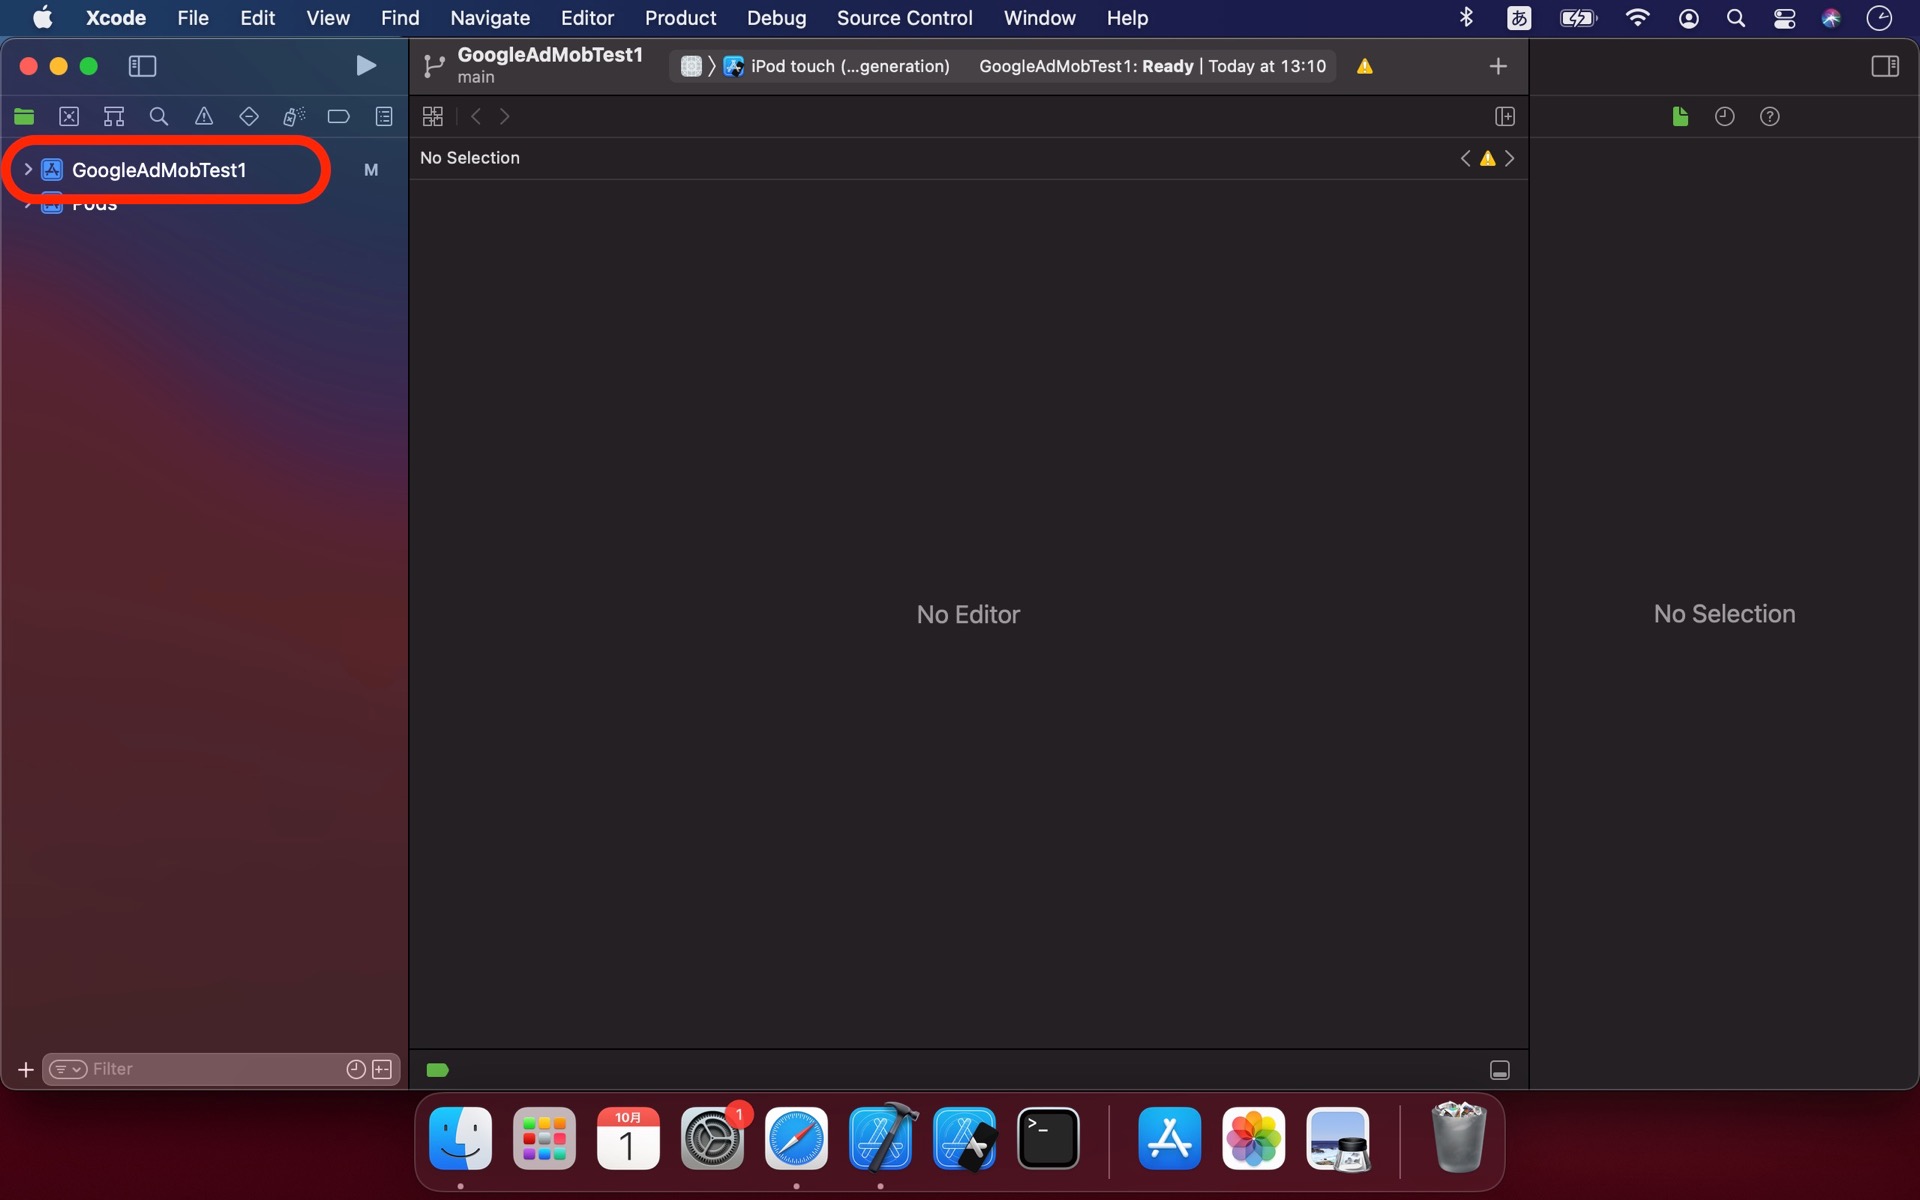
Open .xcworkspace file indicated above.
Decompress your project file by a click.
.xcworkspace ファイルを開き、
左ファイルタブにある、まとめられたプロジェクトファイルを展開します。
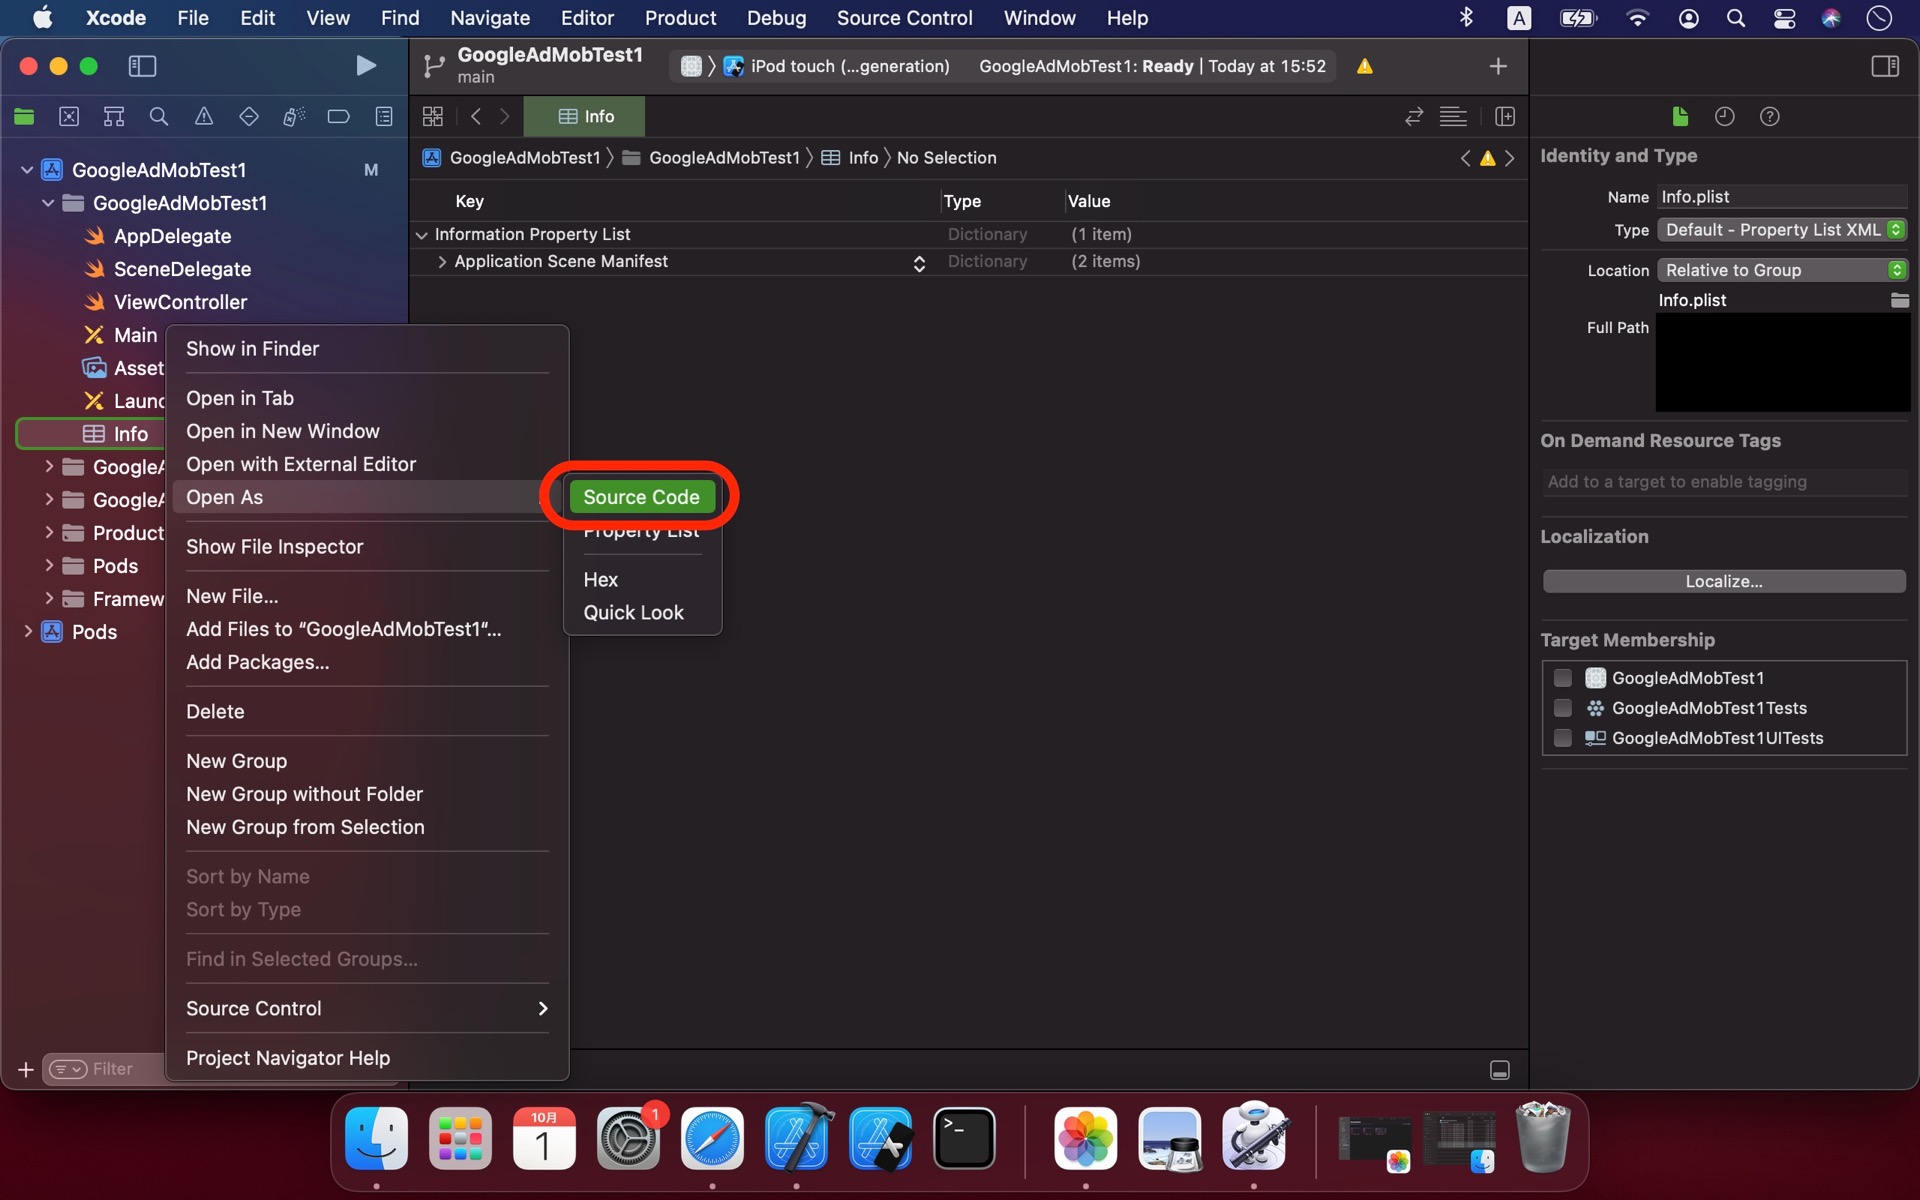
Select [Info.plist] (or just [Info]) and open context menu (control + click).
Select [Source Code] in [Open As].
「Info.plist」(もしくは単に「Info」)を選択し右クリック。
「Open As」から「Source Code」 を選択して開く。
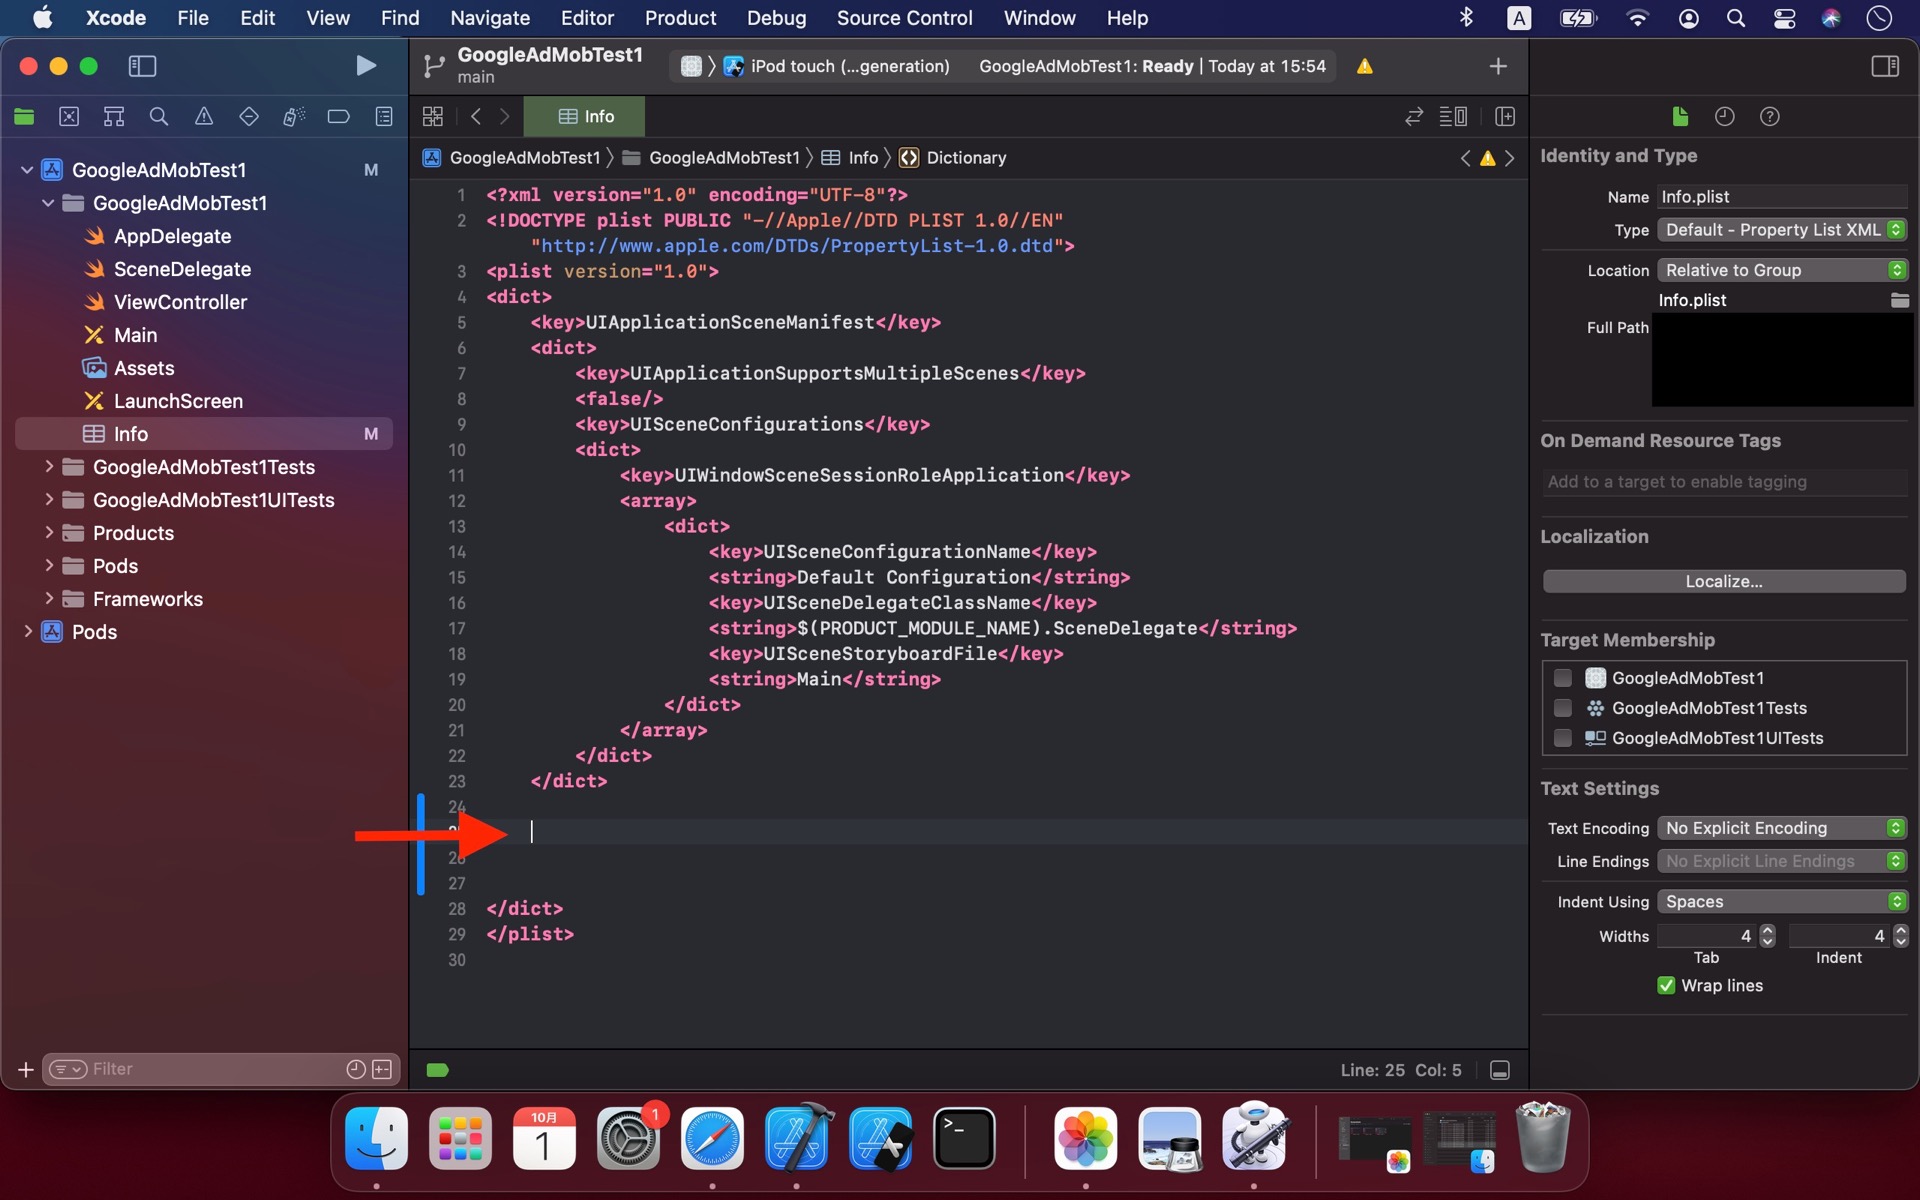
The structure of Info.plist looks like HTML whose code block start with <"any">, end with </"any">.
Copy and paste the following codes in the first hierarchy of "dict".
Info.plist のコードは <"any"> で始まり </"any">で終わる、 HTML と似た構造で記述されています。
下記コードをはじめの <dict> 階層にコピペします。
<key>GADApplicationIdentifier</key>
<string>ca-app-pub-3940256099942544~1458002511</string>
<key>SKAdNetworkItems</key>
<array>
<dict>
<key>SKAdNetworkIdentifier</key>
<string>cstr6suwn9.skadnetwork</string>
</dict>
<dict>
<key>SKAdNetworkIdentifier</key>
<string>4fzdc2evr5.skadnetwork</string>
</dict>
<dict>
<key>SKAdNetworkIdentifier</key>
<string>2fnua5tdw4.skadnetwork</string>
</dict>
<dict>
<key>SKAdNetworkIdentifier</key>
<string>ydx93a7ass.skadnetwork</string>
</dict>
<dict>
<key>SKAdNetworkIdentifier</key>
<string>5a6flpkh64.skadnetwork</string>
</dict>
<dict>
<key>SKAdNetworkIdentifier</key>
<string>p78axxw29g.skadnetwork</string>
</dict>
<dict>
<key>SKAdNetworkIdentifier</key>
<string>v72qych5uu.skadnetwork</string>
</dict>
<dict>
<key>SKAdNetworkIdentifier</key>
<string>c6k4g5qg8m.skadnetwork</string>
</dict>
<dict>
<key>SKAdNetworkIdentifier</key>
<string>s39g8k73mm.skadnetwork</string>
</dict>
<dict>
<key>SKAdNetworkIdentifier</key>
<string>3qy4746246.skadnetwork</string>
</dict>
<dict>
<key>SKAdNetworkIdentifier</key>
<string>3sh42y64q3.skadnetwork</string>
</dict>
<dict>
<key>SKAdNetworkIdentifier</key>
<string>f38h382jlk.skadnetwork</string>
</dict>
<dict>
<key>SKAdNetworkIdentifier</key>
<string>hs6bdukanm.skadnetwork</string>
</dict>
<dict>
<key>SKAdNetworkIdentifier</key>
<string>prcb7njmu6.skadnetwork</string>
</dict>
<dict>
<key>SKAdNetworkIdentifier</key>
<string>v4nxqhlyqp.skadnetwork</string>
</dict>
<dict>
<key>SKAdNetworkIdentifier</key>
<string>wzmmz9fp6w.skadnetwork</string>
</dict>
<dict>
<key>SKAdNetworkIdentifier</key>
<string>yclnxrl5pm.skadnetwork</string>
</dict>
<dict>
<key>SKAdNetworkIdentifier</key>
<string>t38b2kh725.skadnetwork</string>
</dict>
<dict>
<key>SKAdNetworkIdentifier</key>
<string>7ug5zh24hu.skadnetwork</string>
</dict>
<dict>
<key>SKAdNetworkIdentifier</key>
<string>9rd848q2bz.skadnetwork</string>
</dict>
<dict>
<key>SKAdNetworkIdentifier</key>
<string>n6fk4nfna4.skadnetwork</string>
</dict>
<dict>
<key>SKAdNetworkIdentifier</key>
<string>kbd757ywx3.skadnetwork</string>
</dict>
<dict>
<key>SKAdNetworkIdentifier</key>
<string>9t245vhmpl.skadnetwork</string>
</dict>
<dict>
<key>SKAdNetworkIdentifier</key>
<string>4468km3ulz.skadnetwork</string>
</dict>
<dict>
<key>SKAdNetworkIdentifier</key>
<string>2u9pt9hc89.skadnetwork</string>
</dict>
<dict>
<key>SKAdNetworkIdentifier</key>
<string>8s468mfl3y.skadnetwork</string>
</dict>
<dict>
<key>SKAdNetworkIdentifier</key>
<string>av6w8kgt66.skadnetwork</string>
</dict>
<dict>
<key>SKAdNetworkIdentifier</key>
<string>klf5c3l5u5.skadnetwork</string>
</dict>
<dict>
<key>SKAdNetworkIdentifier</key>
<string>ppxm28t8ap.skadnetwork</string>
</dict>
<dict>
<key>SKAdNetworkIdentifier</key>
<string>424m5254lk.skadnetwork</string>
</dict>
<dict>
<key>SKAdNetworkIdentifier</key>
<string>uw77j35x4d.skadnetwork</string>
</dict>
<dict>
<key>SKAdNetworkIdentifier</key>
<string>578prtvx9j.skadnetwork</string>
</dict>
<dict>
<key>SKAdNetworkIdentifier</key>
<string>4dzt52r2t5.skadnetwork</string>
</dict>
<dict>
<key>SKAdNetworkIdentifier</key>
<string>e5fvkxwrpn.skadnetwork</string>
</dict>
<dict>
<key>SKAdNetworkIdentifier</key>
<string>8c4e2ghe7u.skadnetwork</string>
</dict>
<dict>
<key>SKAdNetworkIdentifier</key>
<string>zq492l623r.skadnetwork</string>
</dict>
<dict>
<key>SKAdNetworkIdentifier</key>
<string>3qcr597p9d.skadnetwork</string>
</dict>
</array>
③Initialize GAdMob (GAdMobを設定)
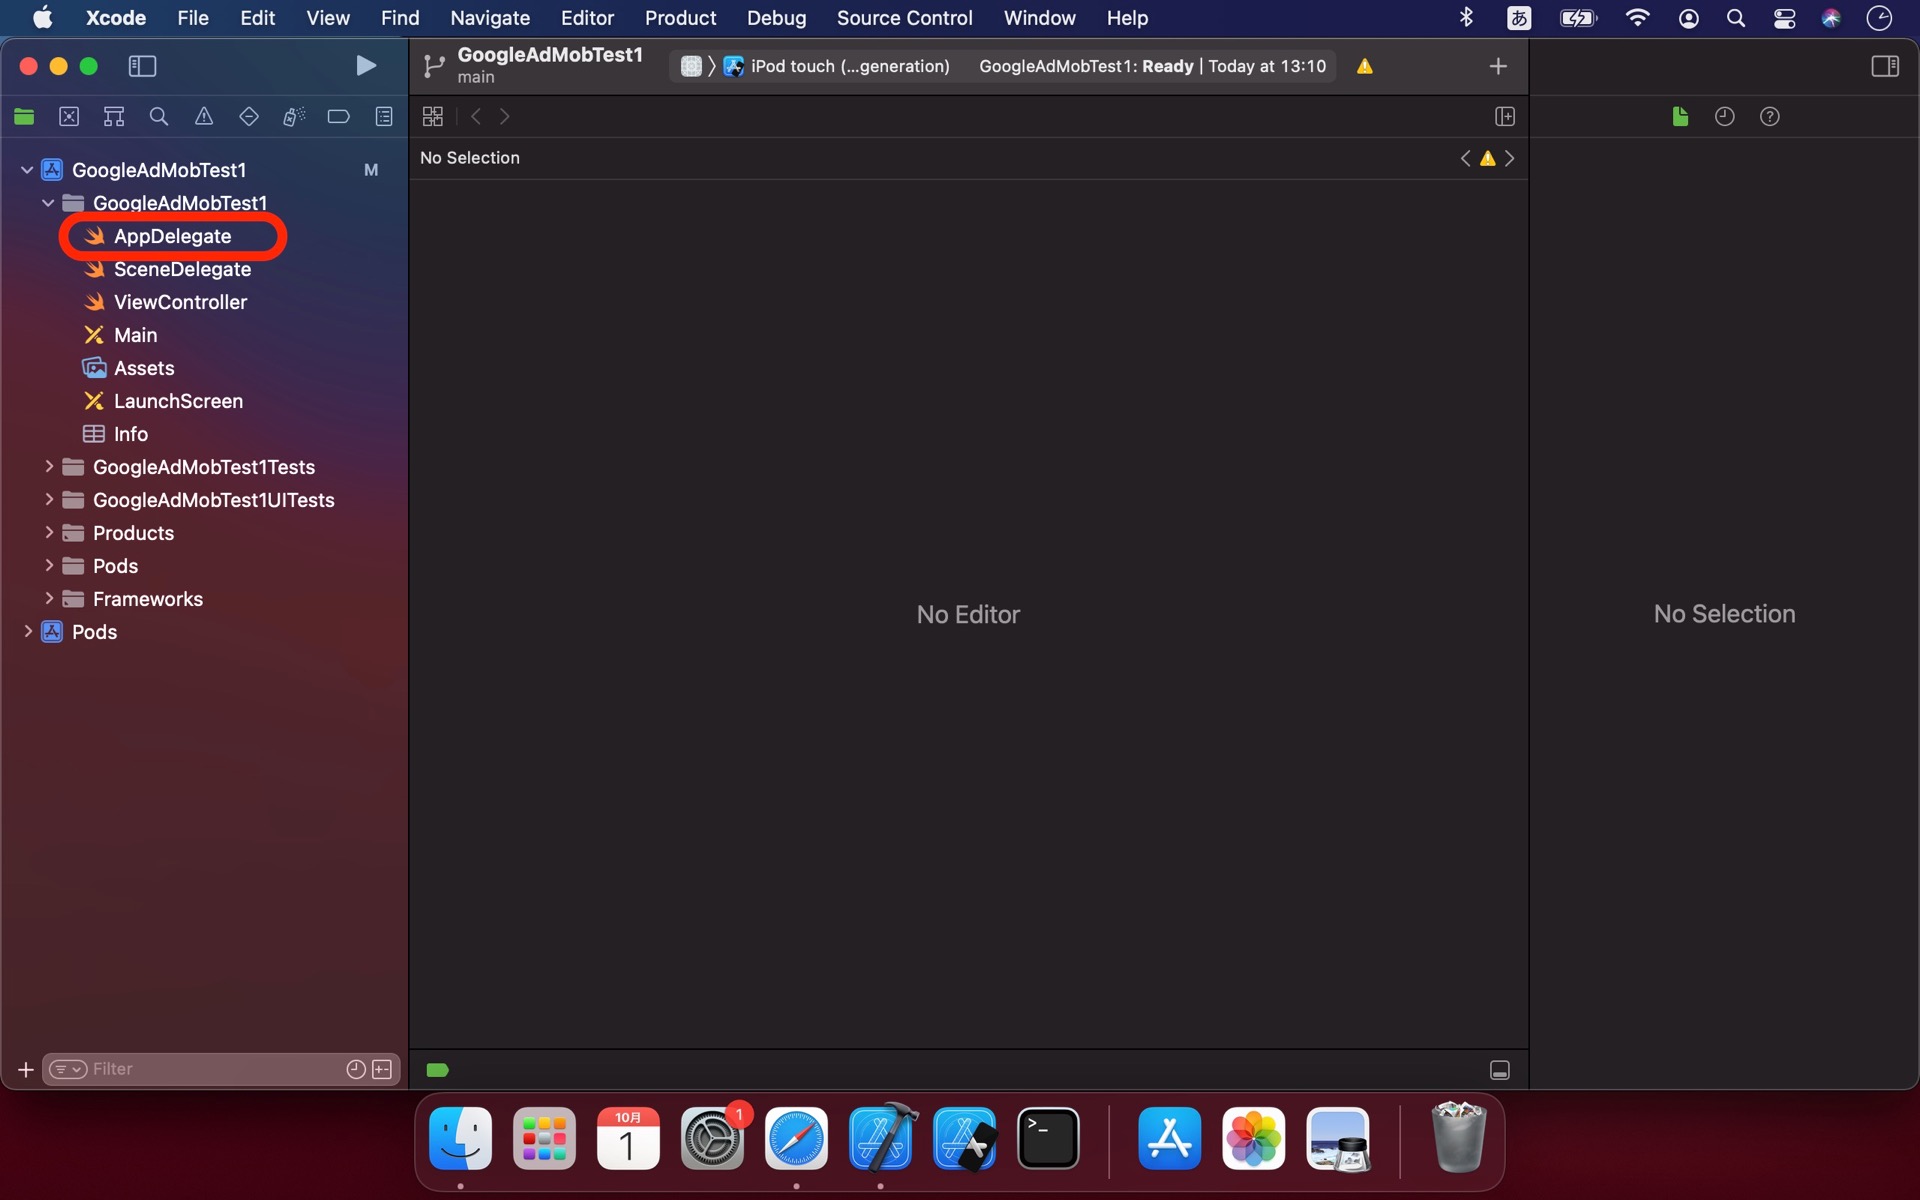
Open AppDelegate file.
AppDelegate ファイルを開きます。
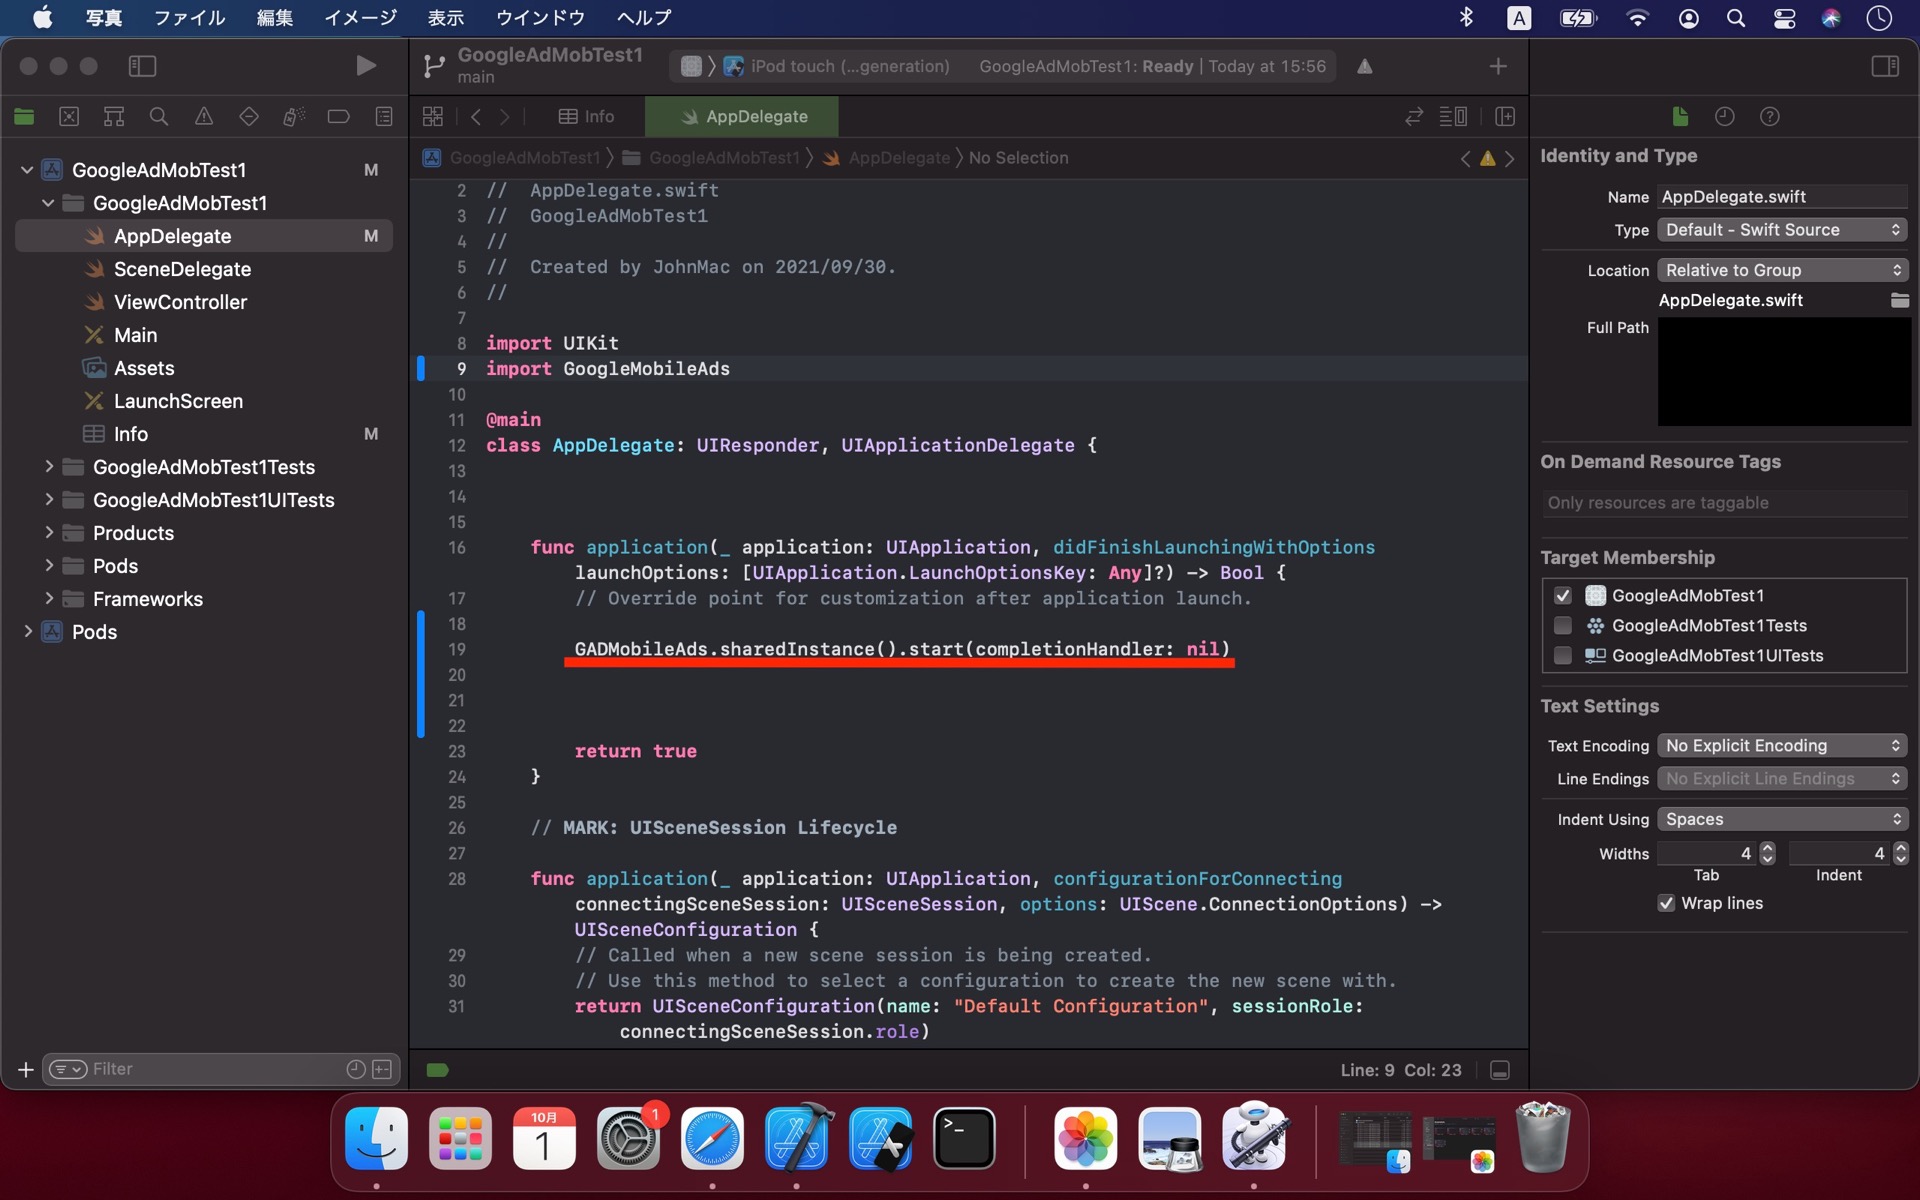
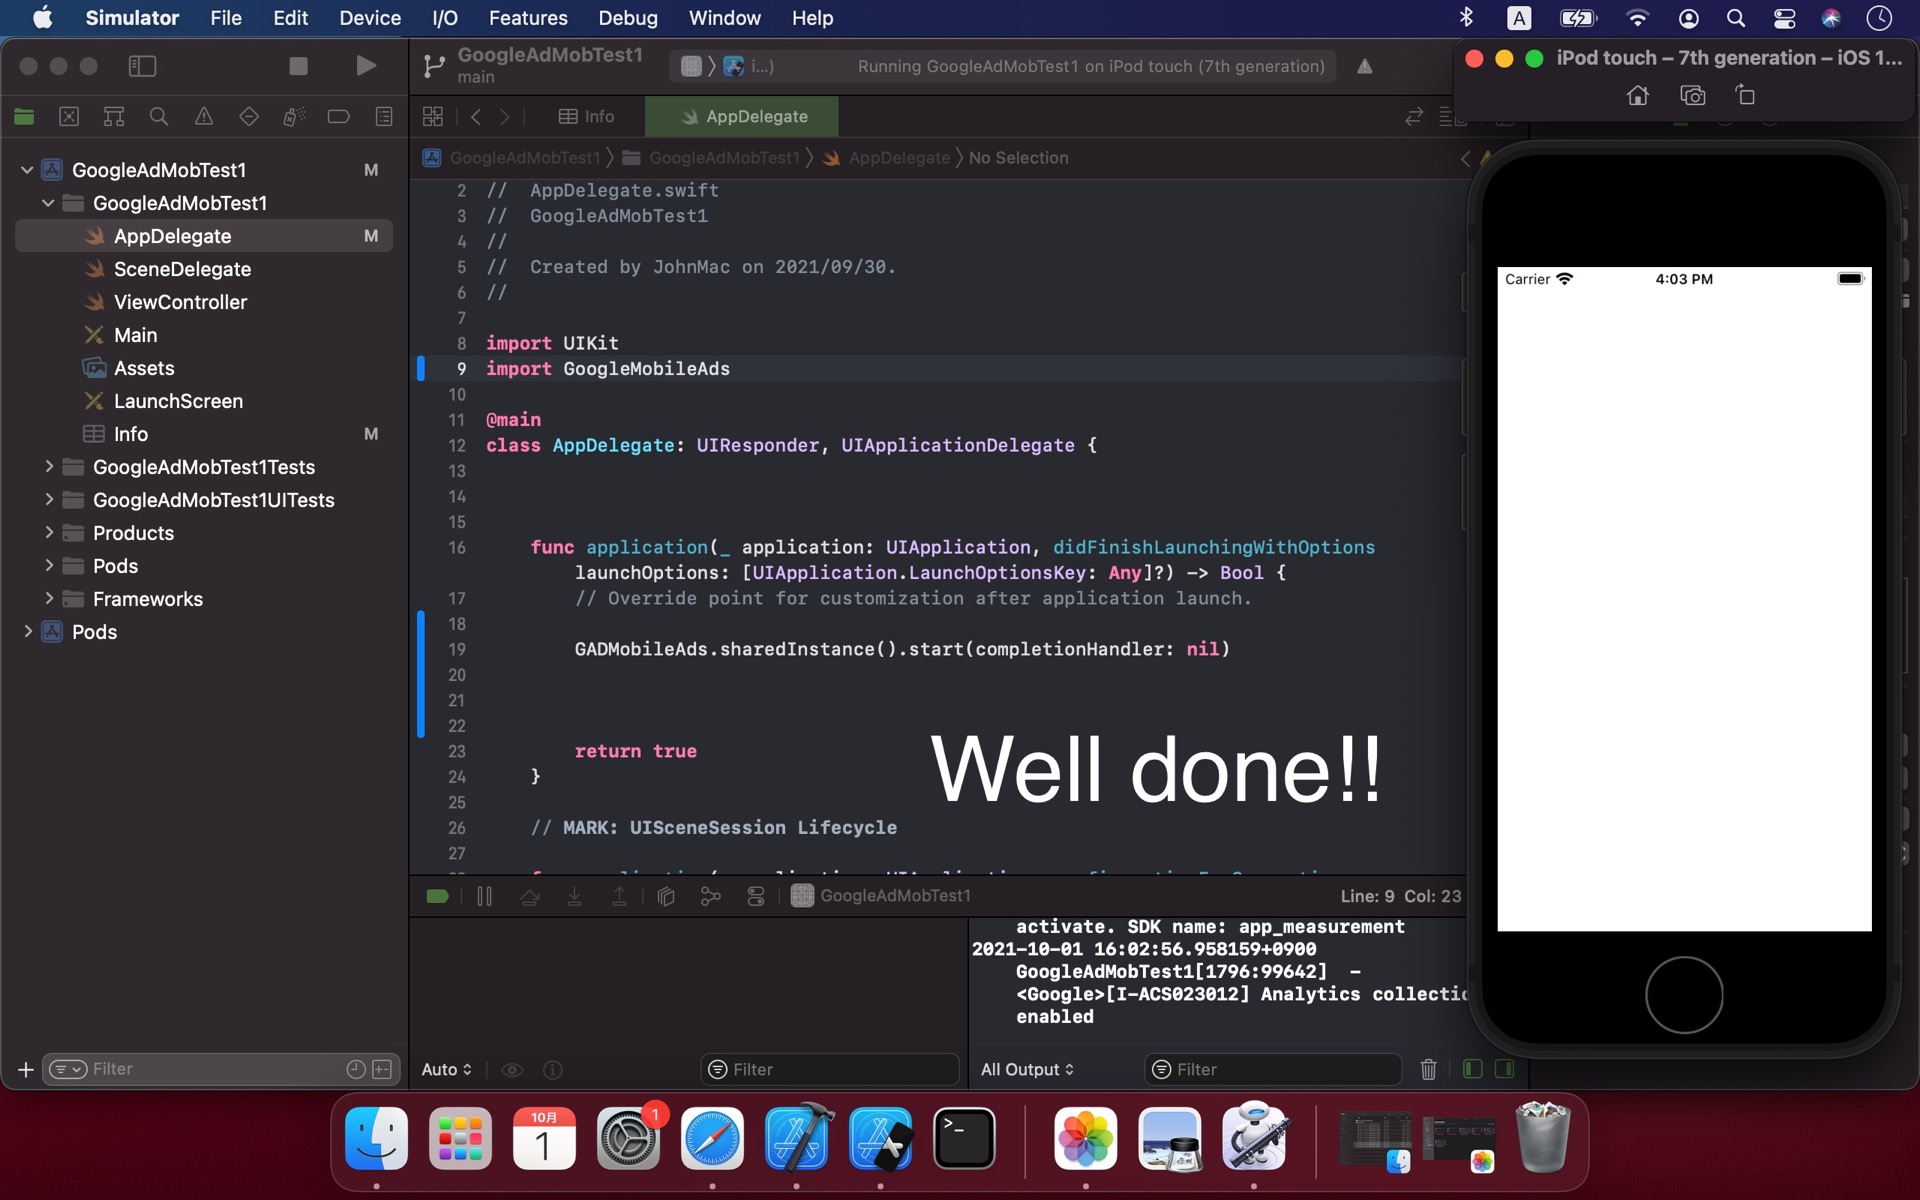
Describe [import GoogleMobileAds] under [import UIKit].
Copy and paste [ GADMobileAds.sharedInstance().start(completionHandler: nil) ] at first func block.
「import UIKit」のすぐ下に「import GoogleMobileAds」と打ちます。
一つ目のfunc applicationの中に「GADMobileAds.sharedInstance().start(completionHandler: nil)」をコピペ。
Run(command + R)!!
It works if the simulator appears and build log expresses.
実行してみましょう!(やや左上の再生マーク乃至command + R)
シミュレータが起動してログが流れたらうまくいっている証拠です。
The first paragraph of info.plist,
<string>ca-app-pub-3940256099942544~1458002511</string>
is test Id for development.
At the time you release your app, the Id must be replace distributed Id from AdMob by registering your app.
Keep using test Id while developing or take risks to be stopped your AdMob account.
Info.plist の一段落目に <string>ca-app-pub-3940256099942544~1458002511</string> とあります。
これはテスト用のappIdであり、リリース時にはAdMobアカウントを作成・アプリを登録し、
配布されたappIdを代わりに記述する必要があります。
開発段階で登録Idを使うとアカウント停止等の措置があるそうなので気をつけましょう。
